As Thanksgiving quickly approaches it’s time to prep the bird. My bird is not a display piece and will need to be carved in the kitchen. But if you want a turkey that will cook up evenly in about an hour and a half with juice dripping out of the breast meat as you cut into it, this is the recipe for you. On the other hand if you are looking for a display turkey to carve at the table, move on to another recipe, this one’s not for you.
Brining is an important step that helps keep the meat incredibly juicy by increasing its moisture as well as gently flavoring the bird all the way through to the bone. This step is equally important even if you don’t butterfly your bird and choose to keep it whole. The brining process assures that your breast meat will be juicy while your dark meat has a chance to finish cooking.
I butterfly my turkey and flatten it out so it will cook evenly in about an hour and a half with the dark meat cooked through while the breast meat remains amazingly juicy. Butterflying my bird not only results in an evenly cooked bird in a short amount of time. It also allows me to remove the back bone and parts to make my gravy ahead of time and not wait for the drippings after the bird is cooked.
It takes a little more work and planning ahead in the preparation process but in my opinion it is worth the effort (when no one is around) so that on turkey day (when everyone is around) it’s easy cheesy.
A trick I learned from Alton Brown is to place a piece of foil over the breast meat of your bird before it goes in the oven so you can mold it. Then when it’s time to cover the breast meat your foil is already formed and can be simply placed over the hot bird without any fuss.
BRINED & BUTTERFLIED TURKEY
Turkey, any size
BRINE
½ cup kosher salt
2 Tbsp. brown sugar
½ gal. hot tap water (8 cups)
½ gal. cold tap water (8 cups)
Dissolve the kosher salt and brown sugar in the hot tap water. Add the cold tap water and mix. This is your brine for your turkey.
PREP THE TURKEY DAY 1:
Rinse turkey with cold tap water and remove all parts from both cavities front & back. Save for your gravy. I don’t care for the bag of kidneys and liver so I toss them out but I save the rest.
Dry with paper towels and place turkey breast side down on a chopping board.
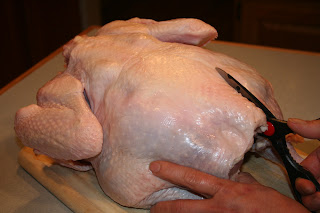
Remove back bone down both sides of the ribs. This will be about a 2 – 3 inch wide section that when removed is a long strip. Save this for Turkey Gravy Recipe.
Remove back bone down both sides of the ribs. This will be about a 2 – 3 inch wide section that when removed is a long strip. Save this for Turkey Gravy Recipe.
I use a cleaver because it’s the fastest way and I am comfortable with it but can be dangerous if you are not. The other option is to use a sharp pair of kitchen scissors which will be a little harder but safer.
 |
| If using a scissors, lay turkey breast side down. |
 |
| If using a cleaver, stand your turkey up. |
PREP THE TURKEY DAY 2:
Remove the turkey from the brine and dry well with paper towels.
Rub dry turkey with softened butter or olive oil. Generously sprinkle with seasoned salt (I used Johnny’s). This is mainly to season the skin and help it get brown because the turkey meat is already flavored through the brining process.
Place a thermometer in the thickest part of the breast making sure not to touch the bone.
Roast turkey in a 500 degree oven for 20 – 30 minutes. This is to get the skin well colored and remove some of the fat.
Place a foil sheet over the breast so that the skin won't get too dark and drop the temperature to 350 degrees and continue cooking until the thermometer reads 160 degrees (45 minutes to an hour, depending on the size of the turkey)
Remove turkey from the oven and tent with foil (don’t seal). Let turkey rest for at least 30 minutes before cutting.
PRINT RECIPE
PRINT RECIPE


The best turkey I've made. It's very moist and cooks so quickly. I've made it at least three times and it's always great!
ReplyDeleteThis is my 3rd year to butterfly a turkey. Will never cook it another way again!!!! Saves half the day and soooooo moist.
ReplyDeleteIt is a little more work ahead of time, but worth the effort on Turkey Day!
Delete